 Timesheets
Timesheets are to be for workers that are not necessarily tied to one drill but could be working on multiple things while on site. This could be a support role such as a mechanic or supervisor.
To make a Timesheet, click on the Timesheet button ![]() at the bottom of the app.
at the bottom of the app.


New Timesheet
To start a new Timesheet click on the Start New Button![]() .
.
Caution
Before you start a new timesheet, you must complete and submit any current and unsubmitted reports, as any unsubmitted reports will be lost when you start a new shift report.
To refresh the data and sync the Timesheet click on the Refresh button  (accessed through the menu
![]() ).
).
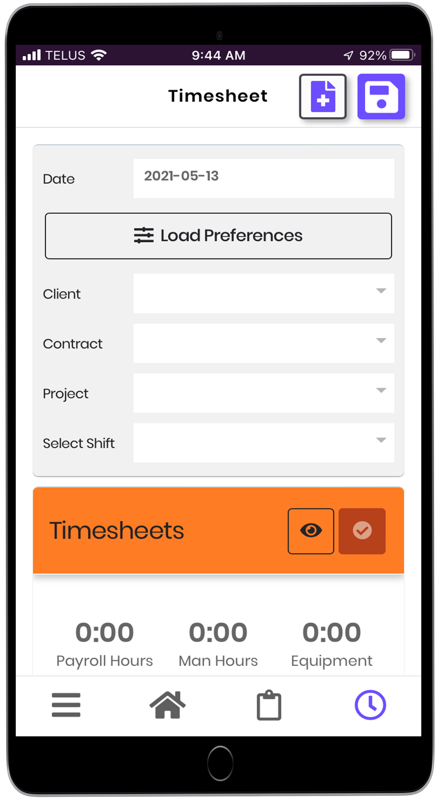
Header Information
Once a new Timesheet has been started, fill out the Date, Client, Contract, and Project by clicking on the corresponding drop-down menus and choosing the appropriate value. If preferences have already been setup, click on the Load Preferences button  to autofill the values.

Note
The Date field will default to yesterday’s date when you create a new timesheet report. Always be mindful to select the appropriate date when entering reports.
If you submit a report with the incorrect date contact your supervisor or company Krux admin to edit it in KruxMetrix web portal, if they are unable to you can reach out to support@kruxanalytics.com
To see an overview of the Timesheet, click on the Overview button ![]() .
.

The overview will show the workers that have been added to the timesheet along with their hours.

Click on the ![]() Arrow in the top left corner of the screen to go back to the Timesheet main page.
Arrow in the top left corner of the screen to go back to the Timesheet main page.
General Report Completion
In general you will need to:
- Click on each field
- Workers
- Activities
- Fluids
- Consumables
- Forms
- Click the purple "Add" button/drop-down menu
- Fill out the drop-down menus with the appropriate variables
- Click the Save button in the top right of the screen to save the variables.
- Submit the report
Workers
Edit the Workers component of the timesheet by clicking on the Workers bar.

Workers already setup in the KruxMetrix Presets will appear listed. To add another worker, click on the  button, then select the workers name Name by scrolling or using the search. Then select the Role, Payroll Hours, and Drill/Drills (optional) by clicking on the corresponding drop-down menu.
To add needed comments, click in the Comments text box and type them in.
Repeat the process described above to add additional workers if necessary.
Once all the required workers have been added, click on the Save button ![]() to save and return to the Timesheets main page.
to save and return to the Timesheets main page.

Activities
Edit the Activities component of the timesheet by clicking on the Activities bar.

Click on the Add New Activity button  and select the appropriate Activity from the list.

If you are missing activities you need in the drop down list, contact your company’s local Krux administrator. Items need to be setup from the Presets in KruxMetrix Web Platform in order for them to appear in the App. If they are unable to fix the issue, contact Krux Support at support@kruxanalytics.com.
To add a comment, click on the Comments text box and type it in. To add how much time was performed on the Activity click in the Hours drop-down menu, select the amount of time, then click Confirm. You may have the option to select smaller increments such as 5-minutes if your administrator has set this up.

Add Workers to the activity by clicking on the Add Workers button ![]() .
.
Check off the check box next to the needed Workers. If there are a lot of workers click on the Select All button to save time. Once all of the needed workers have been added, click the Save button ![]() .
.

To record equipment used for the activity click on the ![]() button. Choose the Equipment by clicking on the Equipment drop down menu and clicking on the required piece.
button. Choose the Equipment by clicking on the Equipment drop down menu and clicking on the required piece.

If an incorrect piece of Equipment was chosen, click on the ![]() button located to the top left of the Equipment name. If no Equipment is required, click on the
button located to the top left of the Equipment name. If no Equipment is required, click on the ![]() button located below the
button located below the ![]() button.
button.
If a specific Unit is required, click on the Unit drop-down menu and select the appropriate unit.

The Equipment Hours will be auto filled for the entirety of the activity. If the equipment was only used for part of the activity, edit the time by clicking on the Equipment Hours drop down menu, then selecting the correct amount of time, and finally click Confirm.
Repeat the process described above to add additional Activities if necessary.
Once all the required Activities have been added, click on the Save button ![]() to save and return to the Timesheets main page.
to save and return to the Timesheets main page.
Consumables
Edit the Consumables component of the timesheet by clicking on the Consumables bar. The Consumables bar will illustrate how many consumables are currently attached to the Timesheet.
To add another consumable, click on the ![]() button, then select the consumable and associated details.
button, then select the consumable and associated details.
Once all the required consumables have been added, click on the Save button ![]() to save and return to the Timesheets main page.
to save and return to the Timesheets main page.
Fluids
Edit the Fluids component of the timesheet by clicking on the Fluids bar. The Fluids bar will illustrate how many fluids are currently attached to the Timesheet.

To add another fluid, click on the ![]() button, then select the fluid. Then select the type, volume, unit and cost.
button, then select the fluid. Then select the type, volume, unit and cost.
Once all the required fluids have been added, click on the Save button ![]() to save and return to the Timesheets main page.
to save and return to the Timesheets main page.
Forms
Edit the Forms component of the timesheet by clicking on the Forms bar. The Forms bar will illustrate how many forms are currently attached to the Timesheet and the number or Outstanding forms that need to be attached.

Upon entering the Forms page, required forms that are mandatory to be submitted with every Timesheet will be highlighted Required in red font. To download a copy of the required form, click on the  to download.

Once the form is filled out appropriately, click on the ![]() to attach the desired file, then click Open. The file will attach and have a green Attached checkbox when successful. A Comments text box will appear and any desired Comment can be added there.
to attach the desired file, then click Open. The file will attach and have a green Attached checkbox when successful. A Comments text box will appear and any desired Comment can be added there.
Forms filled out on a mobile device will also have the option to take a picture of the form, which allows the form to be uploaded from a piece of paper or from a saved screenshot.
Click on the ![]() next to the
next to the ![]() . The option to select the image from the user Library or to use the Camera will appear near the bottom of the screen.
. The option to select the image from the user Library or to use the Camera will appear near the bottom of the screen.

Tap on the desired option and choose the needed file. The file will then be attached.
To be able to submit the Timesheet all of the Required forms will need to be attached.
Optional Forms are not required to submit the Timesheet and can be added by following the same Download, Fill out, and Attach process as detailed above.
Once all the Forms have been downloaded and uploaded, click on the Save button ![]() to return to the Timesheet main page.
to return to the Timesheet main page.
Comments
To add additional comments on the Daily Shift Report main page, click in the Comments text box and type in the required comment. Click on the ![]() to attach a file to the comment section.
to attach a file to the comment section.

Review and Submit Timesheet
It is key to always review the Timesheet before submitting it. Take a look through the Overview, check through the Activities, and make sure that the correct amount of time is captured.
To submit the report for Validation in the Krux Metrix web portal, click on the Submit button near the top of the report.
Edits to previously entered reports must be done through KruxMetrix, navigate to the page. This access is limited by user role and is configured by your administrator.